
PXE Boot Diskless Raspberry Pi 4 With Ubuntu, Ubiquiti and Synology (2): Config TFTP and NFS mounts
Once we get the DHCP part set up, here comes the exciting part - to actually install the Linux distro and boot the Pi using it instead of the vanilla 32-bit Raspberry Pi OS.
Now our Pi is still stuck at the initial screen, but don’t worry, as long as it is trying to read the tftp path we have made progress.
Enable TFTP on the Server Side
Here I will be using the Synology NAS server as the file system server.
Synology offers tftp support in file sharing directly. On the other hand, it’s also fairly straightforward to set up a TFTP server using a Linux server. One thing important is to remember the tftp root directory. That will be used in the next step to copy over the boot files to.
Under that directory create the Pi corresponding directory like
1 | <tftp root>/123456789 |
123456789 refers to last 9 chars of serial no. Pi’s bootloader by default will load from there.
Create the TFTP boot directory
We need to first grab the Linux distro from an image.
Here I picked Ubuntu 20.04 LTS which is “officially” supported. Technically this is probably not the best option as the OS itself includes a lot of things that we may not actually need and the size is pretty bulky. On the other end the Alpine one is very skinny and lacks some of the tooling we may need initially. For raspberry, unfortunately each distro may be slightly different (in terms of boot) so while you are free to choose whatever you want, YMMV.
Flash the image into the SD card and we’ll get 2 partitions - boot and root.
In general, it’s a good idea to first boot the system using the SD card just in case there’s some essential setup we need to complete ahead of time. After that, the remaining Pi boards can replicate the same set of files with minor tweaks.
After that use rsync to copy the boot files:
1 | sudo rsync -xa /boot 192.168.1.60:<tftp root>/123456789/ |
Here we need to perform some cleanup.
Pi will need a few critical files during the boot process.
start4.elf, bcm2711-rpi-4-b.dtb, dtb these are the firmware filesconfig.txt, usercfg.txt, syscfg.txt these are the config files to locate the kernel files and related configsvmlinuz, System.map, initrd.img Linux kernel filescmdline.txt contains config params to pass to the kernel
The overall boot directory structure would eventually look roughly like this:
1 | -rwxr--r-- 1 root root 46612 Sep 7 22:20 bcm2711-rpi-4-b.dtb |
We need to make a few modifications here.
Uncompress the Linux kernel vmlinuz
Pitfall #2: Pi does not uncompress the vmlinuz kernel file
The typical linux kernel vmlinuz is a gzipped executable that’s initially loaded into the memory. However Pi’s bootloader somehow does not uncompress it and as a result upon boot it would be stuck in rainbow screen.
Before uncompressing, be aware that some Linux distro may have a non-0 offset of the actual executable. We can check via od. A gzip file has the header 1f 8b 08 00.
1 | sudo od -A d -t x1 vmlinuz-5.4.0-1022-raspi | grep '1f 8b 08 00' |
Here the offset is 0000000 and hence we can just do
1 | zcat vmlinuz-5.4.0-1022-raspi > vmlinux-5.4.0-1022-raspi |
Specify the kernel file location in config
Pitfall #3: The default Uboot config does not work
I didn’t verify other distros but at least with the ubuntu image, the default config is to use uboot. However with netboot config, it would be stuck locating the kernel and other stuff. So here we will tell Pi to boot directly with the vmlinux file we just uncompressed.
So here we will comment out the original entries and just specify the kernel directly in all section:
1 | [pi4] |
Here we are sort of breaking the best practice by specifying the fixed version here so we are not getting updated kernel. We are doing this because the kernel needs to be uncompressed and initrd needs to match the version. Technically the kernel update process can include the uncompression as well but that would be a TODO item.
Update cmdline.txt
Here we need to tell the kernel how to mount the root fs.
Since we are going to set up the diskless boot we will mount via nfs.
The cmdline.txt would roughly be like:
1 | net.ifnames=0 dwc_otg.lpm_enable=0 console=serial0,115200 console=tty1 root=/dev/nfs nfsroot=192.168.1.60:<nfs root>/raspberry/123456789 ip=dhcp elevator=deadline rootwait fixrtc rw |
Here the nfs root is the directory in the NAS. 192.168.1.60 is the NAS IP. 123456789 again is the Pi serial but it technically could be anything unique. We are setting it like that for consistency.
So far we have finished configuring the tftp side.
Create NFS root fs
Copy over Files
Similar to boot directory we will rsync the root fs:
1 | sudo rsync -xa / 192.168.1.60:<nfs root>/raspberry/123456789 |
Here -x is important to ensure we don’t copy anything mounted.
Particularly the boot directory would be left out and we can either make a soft link back to the one under tftp, or mount it in /etc/fstab explicitly.
Update /etc/fstab
Update the one we just copied over to NAS nfs directory as that would be read upon next boot.
1 | 192.168.1.60:<nfs root>/raspberry/123456789 / nfs defaults,rw,nolock 0 0 |
Here we’ll mount some of the tmp dirs to tmpfs (mem fs).
The root fs is technically not required as in cmdline.txt the kernel already mounts it as rw but here we are explicitly marking it so and turning off disk check.
Enable NFS Server
For Synology this part is easy, in file sharing there’s an option to turn on NFS in File Services.
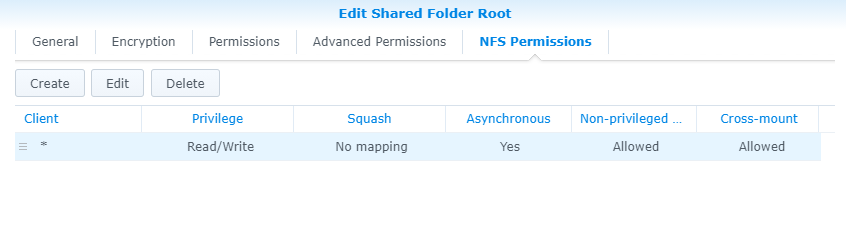
Remember to turn off NFS squash in shared file
Testing and Troubleshooting
So far we have completed the necessary steps. It’s time to unplug the Pi, remove the microSD card and reboot.
The Pi should tell us it fails reading the card and will try PXE boot next.
On the first screen it should show what files it’s trying to read and if it’s stuck on some of them check the tftp logs to see if they are placed properly.
Next it will show the rainbow screen like this

If you see this, that means Pi’s GPU has been properly initialized and next it would try to load the kernel.
If the screen is stuck in this step, go back to check if the kernel file is properly uncompressed and referred to in config.txt file.
This screen should last for a few seconds to tens of seconds depending on network speed. After that the Linux kernel executable should take it over to init other stuff and mount the NFS root.
initramfs would be loaded at this moment and if the version does not match you might get some random weird errors. If NFS is not mounted correctly, it would tell so.
With Ubuntu depending on your actual env, there may be a few other extra non critical errors we need to fix like cloud-init but typically they would not block the startup process.
Now we should be able to ssh into the system with the username ubuntu.
Congrats we have finished the netboot setup and this can be replicated to other Pis with the same process.