
PXE Boot Diskless Raspberry Pi 4 With Ubuntu, Ubiquiti and Synology (1): DHCP Setup
Raspberry Pi 4 is shipped with a flashable EEPROM and supports netbooting. However, the entire setup process is not that straightforward and it’s thus worth writing down all the pitfalls through the path especially when it involves a non-“native” Linux distribution.
One thing worth noting is that even though this post mentions “PXE” and so does the official document, the boot process isn’t entirely PXE compliant and thus regular PXE boot support setup process may not work at all or at least not directly.
Here’s a diagram of the network topology I use for the setup:
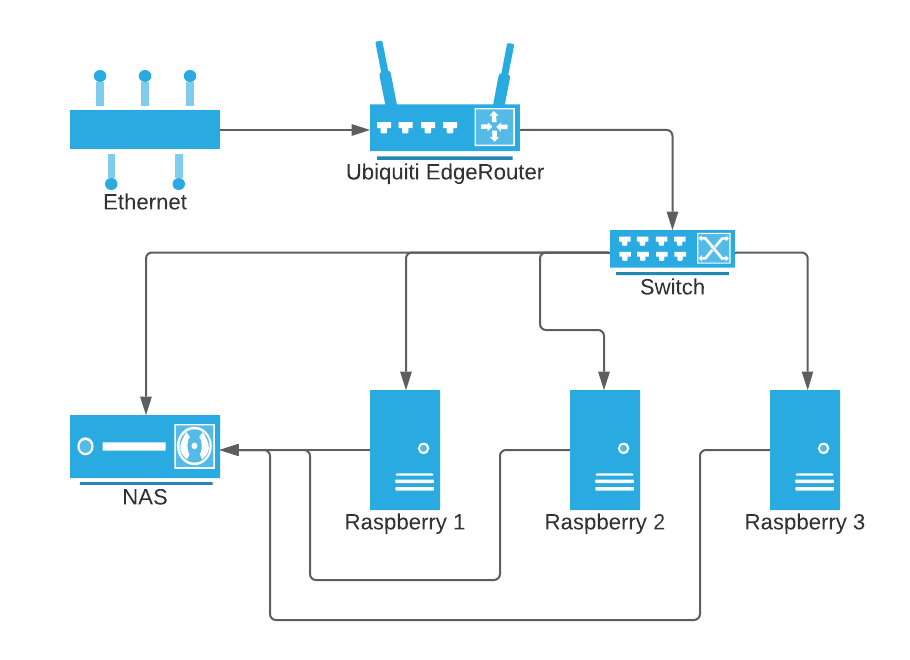
The Ubiquiti will also be serving as the DHCP server. The Synology NAS will be serving data via tftp (pxe boot) and nfs (post boot). Due to kernel limitation, my NAS cannot support overlayfs. But for newer version of NAS it might be possible.
Raspberry Netboot Sequence
The bootloader in EEPROM by default does not enable netboot so we’d need to enable that first.
Once enabled, upon powering up, Pi will first send a DHCP request to ask for the TFTP server location and verify if netboot is supported.
After that it will fetch the firmware (start4.elf), configs and kernel files (vmlinuz) from that tftp location. The bootloader has a config to specify the exact path for the current device. By default, that’s the last 9 chars of the serial number. This is important as certain config (like cmdline.txt) would tell the OS how to mount the root fs and thus needs to be separate.
The kernel will later be loaded which takes over the boot process and eventually loads the rest of the system distribution.
The official doc can be found here.
Flashing the EEPROM to Enable Netboot
With the basic knowledge equipped, we can continue by first enabling the netboot in bootloader.
To do that, we need to grab the updated version of bootcode.bin file which supports netboot and update the config.
This also requires using the raspberry cli binary vcgencmd.
Pitfall #1: vcgencmd can only work in native Raspberry Pi OS
Yes the vcgencmd binary does not work in Ubuntu or any other “supported” Linux distros, even if you compile from source. They would just silently fail. Technically it should be doable if they are shipped with the right “stuff” but I decide not to waste more time figuring out what the “stuff” is.
Here we need a small microSD card to flash the Raspberry Pi OS onto it and boot the system. For headless setup, don’t forget to touch ssh to create the file to enable ssh by default.
The default user name and password is pi and raspberry.
Run
1 | vcgencmd bootloader_config | grep BOOT_ORDER | cut -d '=' -f 2 |
To check the current boot order. The boot order is a sequence of digits from right to left. The default is 0x1 (or 0xf41 in later version) which means it’s SD card only (or SD -> USB -> restart). We’ll change this to 0xf21 (SD -> Network -> restart).
The full doc about order can be found here.
To do that, first we need to grab a bootloader that supports netboot. Anything late 2020 should work. For example to grab 2020-07-31 version:
1 | wget https://github.com/raspberrypi/rpi-eeprom/raw/master/firmware/stable/pieeprom-2020-07-31.bin |
Extract the bootconf.txt file and update order:
1 | sudo rpi-eeprom-config pieeprom-2020-07-31.bin > bootconf.txt |
Flash the EEPROM:
1 | sudo rpi-eeprom-update -d -f bootloader.bin |
Before exiting, grab the serial number:
1 | cat /proc/cpuinfo | grep Serial | tail -c 9 |
Assume this is 123456789. This will be used in later tftp setup.
Unplug, remove the SD card and replug the Pi. Now it should be stuck on the initial self test screen as it can neither boot from SD or net. This is expected.
DHCP Setup
Now it comes to the router side as we need to enable the extra options of DHCP such that Pi can find the NAS in the same network.
This step is vendor specific. I use a Ubiquiti router. The command should be more or less the same for anything using OpenWRT.
To enable PXE boot, we first need to figure out what options Pi is asking for. In this case we need tcpdump.
1 | sudo tcpdump -vnes0 port 67 or port 68 |
-v verbose (to list options)-n do not try to look up ip address-e list mac address-s0 do not truncate packet and show full contentport 67 is for client -> server packets and 68 is for the other way around
Restart the Pi to capture the packets.
The DHCP protocol has 4 parts for our interest:
Discover- this is the initial DHCP broadcast request and we need to pay attention to theParameter-Requestpart.Offer- DHCP server responds with allocated IP address and option responsesRequest- Client echoes the IP back to server to confirm allocationACK- DHCP server confirms the echo
Here’s what Pi sends as the initial request:
1 | 19:45:26.963111 <PI MAC ADDR> > ff:ff:ff:ff:ff:ff, ethertype IPv4 (0x0800), length 364: (tos 0x0, ttl 64, id 20586, offset 0, flags [none], proto UDP (17), length 350) |
Here the common options are in plain text like Subnet-Mask while some option extensions are just using numbers. The exact reference can be seen in RFC2132
What we need are:
TFTP (66) - tftp server ip/name -> this should point to the NAS server ipBF (67) - boot file name -> this technically shouldn’t matter for us as the bootloader is directly in Pi’s EEPROM but for consistency we will set this to bootcode.binVendor-Option (43) - This is important and MUST include Raspberry Pi BootVendor-Class (60) - TBH can’t remember if this matters for Pi but I set it to PXEClient anyways to be PXE compliant in general.
To set these in Ubiquiti router:
Use configure to enter config editing mode.
The configs are tree-like and we can list the current options using
1 | show service dhcp-server |
Here certain options are known to the router and we can set directly like tftp-server-name:
Here the NAS is allocated with a static IP 192.168.1.60 so:
1 | set service dhcp-server shared-network-name LAN subnet 192.168.1.0/24 tftp-server-name 192.168.1.60 |
For other stuff it would be a bit tricky as we need to first tell the router what they are:
1 | set service dhcp-server global-parameters "option vendor-class-identifier code 60 = string;" |
and then set them
1 | set service dhcp-server shared-network-name LAN subnet 192.168.1.0/24 subnet-parameters "option vendor-class-identifier "PXEClient";" |
The " part is to actually include a double quote there.
Don’t forget to comment and save the config:
1 | commit; save |
The router should pick up the new config and restart DHCP server as needed. If not reboot it to force the reload.
Now if we tcpdump we’ll see the response packet with something like this:
1 | 19:45:27.963654 <ROUTER MAC ADDR> > <PI MAC ADDR>, ethertype IPv4 (0x0800), length 371: (tos 0x10, ttl 128, id 0, offset 0, flags [none], proto UDP (17), length 357) |
Of course in theory this can be further optimized to include the additional info only when vendor-class includes PXEClient but I omitted that part.
With these in place, the Pi should now be stuck accessing the TFTP server. Congrats and we will cover that in the next part.